Nature’s Treasures – Complete Guide For Class 6 Science Chapter 11

Welcome to iPrep, your Learning Super App. Our learning resources for the chapter, Nature’s Treasures in Science for Class 6th are designed to ensure that you grasp this concept with clarity and perfection. Whether you’re studying for an upcoming exam or strengthening your concepts, our engaging animated videos, practice questions and notes offer you the best of integrated learning with interesting explanations and examples. 

Introduction: Exploring Nature’s Treasures

Nature is abundant with treasures that enrich our lives in countless ways. Let’s begin with the understanding of the chapter Nature’s Treasures with the example of Bhoomi and Surya.

Bhoomi and Surya, during their vacation at their grandmother Ajji’s village in the Western Ghats, discover these treasures firsthand—the pure air, the fertile soil, and the abundance of sunlight that sustains both plants and animals. This chapter takes us on a journey to explore some of the key elements of nature that are essential for life on Earth.

Air: The Breath of Life

Further in the chapter NAture’s Treasures, we’ll understand the concept of air. One morning, Bhoomi and Surya observe Ajji doing breathing exercises. She explains that breathing helps to bring fresh air into our lungs, which keeps us healthy. Air is essential for all living beings as it provides oxygen, which our bodies need to survive.

Activity: Experiencing the Importance of Breathing
  • Instructions:
    1. Take a deep breath and exhale slowly.
    2. Hold your breath for as long as you can and then exhale.

This simple exercise shows how vital oxygen is for survival. Without it, we would struggle to perform even basic functions.

Composition of Air

Air is a mixture of gases, with 78% nitrogen, 21% oxygen, and 1% consisting of other gases like carbon dioxide and argon. This balance is crucial for sustaining life on Earth and having this balance is what makes it one of the most significant nature’s treasures.

GasPercentage
Nitrogen78%
Oxygen21%
Other gases1%

Moving air is called wind. Wind can blow gently, as a breeze, or forcefully, as in storms. Wind power is harnessed using windmills to run flour mills, to pull up water from a well, or to generate electricity. In India, there are many windmill farms. A windmill farm is an area that has a large number of windmills that use the energy of the wind to generate electricity. 

Water: A Precious Resource

Water is essential for survival and it is one of the most important nature’s treasures. Bhoomi and Surya help Ajji water plants and fill troughs for cows. Ajji teaches them how to water plants efficiently to avoid waste.

Activity: Understanding the Uses of Water
  • Uses of Water: Drinking, cooking, bathing, watering plants, cleaning, and industrial uses.

Water covers about two-thirds of Earth’s surface, but most of it is salty seawater, unsuitable for drinking or farming. Only a small portion is available as freshwater, found in rivers, lakes, and underground sources. Freshwater is precious, and Ajji teaches Bhoomi and Surya to use it wisely.

Water Conservation

Further in the chapter Nature’s Treasures, we’ll understand the concept of water conservation. Ajji emphasizes the importance of conserving water. People in some parts of India walk long distances to fetch water, and pollution further limits our supply of freshwater. Water pollution occurs when waste materials like plastic bags, wrappers, and industrial waste are dumped into rivers, streams, and lakes. This makes water unfit for consumption by living beings.

Freshwater sources are limited, leading to water shortages in many parts of India, where people often have to walk long distances to fetch drinking water. To reduce water pollution and conserve water, it is essential to avoid polluting water bodies, use water wisely, and promote sustainable practices. Conserving water ensures that it remains accessible and fit for use by all living beings.

ActivityHow Water is WastedSuggestions to Reduce Wastage
Hand WashingLeaving the tap onTurn off the tap when not needed
Washing ClothesOveruse of waterUse efficient washing techniques
GardeningWatering unnecessarilyWater plants early in the morning

Rainwater Harvesting

Further in the chapter Nature’s Treasures, Ajji explains the process of rainwater harvesting, where rainwater is collected and stored for later use. It is practiced in many homes, schools, and residential societies. An age-old practice in India, traditional systems like stepwells (called Bawadi in Rajasthan and Vav in Gujarat) were built for water harvesting in water-scarce regions. These stepwells not only store rainwater but also collect water seeping from nearby lakes, ponds, and rivers. They have stone-lined trenches that allow water to seep in and be stored. Exploring traditional water harvesting practices in local areas can provide further insights into sustainable water conservation methods.
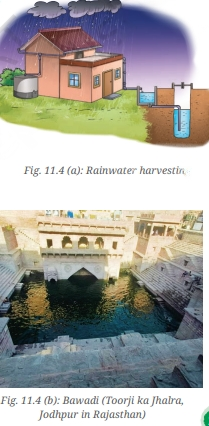
A visual example of bawadi Rajasthan, another oen of the most commonly known natures treasures

Energy from the Sun: A Source of Life

The Sun is the primary source of energy for life on Earth making it one of the most important nation’s treasures. Bhoomi and Surya learn from Ajji that sunlight helps plants make food through photosynthesis. The Sun’s energy is also used for drying clothes, making solar power, and even cooking in solar cookers.

Uses of Solar Energy

  • Solar panels on rooftops and streetlights capture sunlight to generate electricity.
  • Solar water heaters and solar cookers use sunlight for heating and cooking.

The energy from the Sun is essential for sustaining life, from plants to animals, and we rely on it in countless ways.

A visual representing uses of solar energy from class 6 science chapter 11 - Nature's Treasures

Forests: The Green Treasure

While further discussing nature’s treasures, Ajji takes Bhoomi and Surya on a walk through the forest, where they see various plants, animals, and birds. Forests are vital ecosystems that provide shelter, food, and oxygen for living beings. They help maintain the balance of nature and play a crucial role in preventing soil erosion.

Van Mahotsav: Celebrating Forests

As mentioned in the chapter Nature’s Treasures, saaan Mahotsav, celebrated in July, is a week-long festival in India dedicated to planting trees and raising awareness about forest conservation.

The Importance of Forests

The chapter Nature’s Treasures significantly shares the importance of forests. It involves-

  • Forests provide wood, fruits, medicinal plants, and many other resources.
  • The roots of trees hold the soil together, preventing erosion.
  • The decaying leaves enrich the soil with nutrients, supporting new growth.

The Chipko movement, where women hugged trees to protect them from being cut down, highlights the importance of conserving forests.

Soil, Rocks, and Minerals

The chapter Nature’s Treasures further discusses soil, rocks, and minerals.
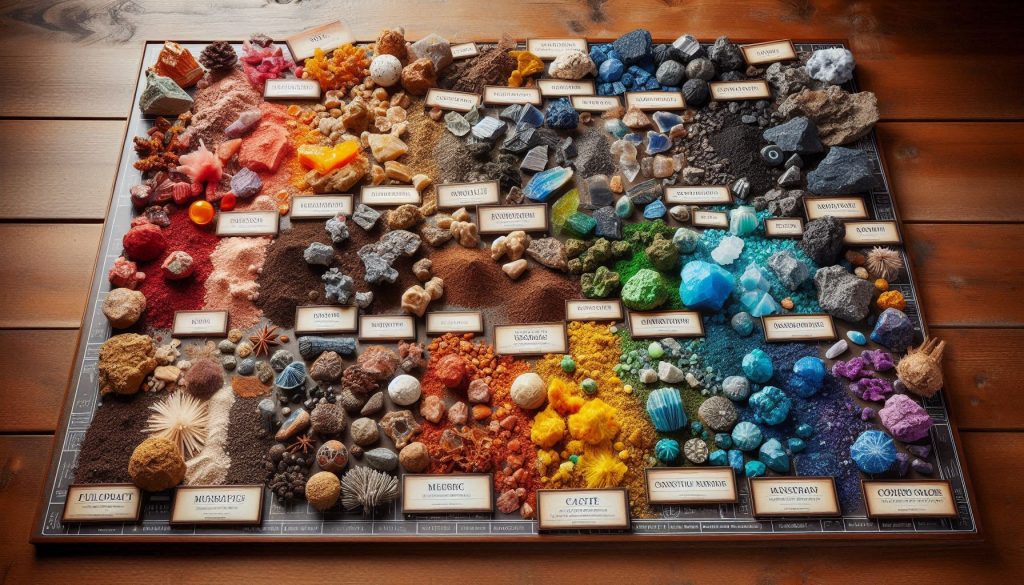
soil rocks and minerals natures treasures

Bhoomi and Surya help Ajji prepare the garden soil for planting vegetables by loosening lumps and digging the soil. While working, they observe earthworms, which naturally aid in turning and loosening soil. Through an activity, they collect soil samples from different places, observe their color and texture, and compare their observations using a magnifying lens. Soil contains various materials, including sand, insects, and organic matter from decomposed plants and animals.

Soil is formed over thousands of years from the disintegration of rocks due to natural forces. Different types of soil are suitable for different purposes, such as growing plants or making bricks. Rocks like granite, sandstone, and marble are essential in construction, while minerals extracted from rocks are used in tools, electronics, and other products.

Rocks are made of minerals, which provide important metals like gold, copper, and iron. These minerals are vital for manufacturing goods like vehicles and electronics. Since rocks and minerals take millions of years to form, it is crucial to use and conserve them responsibly. Additionally, most transportation relies on fossil fuels, connecting the use of minerals to energy consumption.

Activity: Investigating Soil
  • Instructions:
    1. Collect soil samples from different areas.
    2. Observe the color, texture, and contents of each sample.
    3. Use a magnifying lens to look closely at the soil.
LocationGuessObservation with Naked EyeObservation with Magnifying Lens
GardenDark soilMoist with organic matterTiny particles and organisms
RoadsideDry and sandyCoarse and rockyNo visible organisms

Soil is formed over thousands of years through the weathering of rocks, and it supports biodiversity.

Fossil Fuels: The Buried Treasure

Petrol, diesel, and kerosene, the most commonly used fuels for vehicles, are derived from petroleum. Along with natural gas and coal, these are called fossil fuels, formed from the remains of ancient microorganisms and plants buried deep within the earth over millions of years. Natural gas is used for cooking, electricity generation, and as Compressed Natural Gas (CNG) for vehicles, offering a cleaner alternative to petrol and diesel. Coal is mainly used for electricity production.

Fossil fuels are finite, and their overuse leads to air pollution through the release of smoke and carbon dioxide. As supplies diminish, there is a growing need to explore alternative energy sources.

Activity: Survey of Vehicles and Fuels
  • Instructions:
    • Conduct a survey in your neighborhood to identify the types of vehicles and fuels used.
Vehicle TypeFuel Used
CarPetrol or Diesel
BikePetrol
BusDiesel

As fossil fuels are limited, there is a growing need to explore alternative energy sources like solar and wind power.

Renewable and Non-renewable Resources

Natural resources are classified into two categories:

  • Renewable Resources: Air, water, and forests, which can be replenished by nature over time.
  • Non-renewable Resources: Fossil fuels and minerals, which are limited in quantity and cannot be replenished quickly.

Ajji teaches Bhoomi and Surya that we must use resources responsibly, ensuring they are available for future generations.

Resources we use

Bhoomi and Surya notice the polluted air in the city compared to the fresh air at their grandmother Ajji’s home, where fewer vehicles are present. Their mother explains that vehicles using fossil fuels release smoke, contributing to air pollution, but alternatives like electric vehicles reduce pollution. The text prompts a discussion on ways to reduce air pollution and conserve natural resources.

Our daily activities include the usage of natural resources, such as water for washing clothes and wood for fire. The lesson emphasizes the importance of using resources like air, water, and soil responsibly to protect the environment for future generations. The quote by M. K. Gandhi highlights the need to avoid greed and conserve resources.

Conclusion: Conserving Nature’s Treasures

Nature provides us with everything we need—air, water, sunlight, forests, and fossil fuels. It is our responsibility to use these treasures wisely, conserve them, and prevent pollution. By practicing rainwater harvesting, using renewable energy, and protecting our forests, we can ensure a sustainable future for all living beings.

In conclusion, CBSE Class 6th Science Chapter 11 – Nature’s Treasures helps us understand the importance of the natural resources around us. From air and water to forests and sunlight, we rely on these elements for our survival. As highlighted in the chapter Nature’s Treasures, it’s crucial to use these resources responsibly and work towards their conservation. By making sustainable choices, such as practicing rainwater harvesting and protecting forests, we can ensure that the treasures of nature continue to benefit future generations. With the help of the iPrep Learning Super App, you can master Nature’s Treasures through engaging learning resources that bring these concepts to life!

Practice questions on Chapter 11 - Nature's Treasures

Get your free Chapter 11 - Nature's Treasures practice quiz of 20+ questions & detailed solutions

Practice Now
Science

Chapter 11 - Nature's Treasures

Learn more about iPrep

Download the App

Watch lectures, practice questions and take tests on the go.

Living Creatures: Exploring their Characteristics – Complete Guide For Class 6 Science Chapter 10

Welcome to iPrep, your Learning Super App. Our learning resources for the chapter, Living Creatures: Exploring their Characteristics in Science for Class 6th are designed to ensure that you grasp this concept with clarity and perfection. Whether you’re studying for an upcoming exam or strengthening your concepts, our engaging animated videos, practice questions and notes offer you the best of integrated learning with interesting explanations and examples. 

Introduction: Observing Life Around Us

One morning, Avadhi and Aayush were on a walk with their parents when they spotted a shell. When Avadhi tried to pick it up, her mother explained that the shell might house a living snail, even though it wasn’t moving. This sparked a curious question: What makes something alive? This chapter dives deep into the characteristics that differentiate Living Creatures from non-living objects.

What Sets the Living Apart from the Non-Living?

Living and non-living things surround us. Think of the pencil in your hand or the pigeon on the window. What makes the pigeon alive while the pencil is not?

Let’s explore some key characteristics that define living beings:

Activity: Identifying Living and Nonliving

We begin by listing objects around us, identifying if they are living or non-living, and providing reasons.

ObjectMy GuessReasonCorrect AnswerReason for Correct Answer
PencilNon-livingIt doesn’t grow or breathe.Non-livingIt cannot perform any life processes.
BookNon-livingIt does not move or respond.Non-livingNo growth or response to stimuli.
PigeonLivingIt moves, eats, and breathes.LivingPerforms all life functions like movement, respiration, etc.
CarNon-livingMoves but does not grow.Non-livingOnly machines, no life processes.
PlantLivingIt grows and responds to sunlight.LivingPlants perform photosynthesis and grow.

Living creatures grow, reproduce, respond to stimuli, and have a metabolism, while non-living things do not. Movement alone is not a criterion, as even cars move but are not alive.

Movement in Living Creatures

Most Living Creatures move, but not all of them do so in the same way. Plants, for example, do not move from place to place, yet they show movement through processes like the opening of flowers or the winding of climbers. Even insectivorous plants like Drosera trap insects using movements of their sticky, hair-like projections.

Growth as a Sign of Life

Growth is a universal characteristic of Living Creatures. For example, you cannot fit into the clothes you wore four years ago because you have grown. Similarly, plants and animals grow, which is evidence of life.

Respiration in Living Creatures

All Living Creatures breathe. When we inhale, air moves into our lungs, and when we exhale, it moves out. This process is part of respiration. Plants also respire through tiny pores called stomata, which allow air to enter and exit the leaves.

Excretion in Living Creatures

Living Creatures excrete waste. In humans, we excrete through sweat and urine. Plants also excrete excess water and minerals in the form of droplets on their leaves, as seen in grasses.

Response to Stimuli

A stimulus is anything that triggers a response in Living Creatures. For instance, if you step on a thorn, you instantly pull your foot back. Plants like the touch-me-not (Mimosa) also respond to stimuli by folding their leaves when touched.

Reproduction: Creating New Life

All Living Creatures reproduce to continue their species. Whether it’s animals giving birth to young ones or plants producing seeds, reproduction is vital for survival. Without reproduction, life would not continue.

Essential Conditions for Germination of a Seed

Plants are Living Creatures, and a seed is an important stage in a plant’s life cycle. Seeds require specific conditions like water, air, and the right temperature to germinate. Let’s explore this through an activity.

Activity: Conditions for Seed Germination

We sow four bean seeds in different pots and observe their growth under varying conditions.

a visual representation of the Essential Conditions for Germination of a Seed from class 6 science
PotAirSunlightWaterSeed GerminationReason
AYesYesNoNoWater is essential for germination.
BYesYesExcessNoToo much water inhibits air availability.
CYesNoMoistYesMoisture is more important than light for germination.
DYesYesMoistYesAll necessary conditions are present.

Water helps soften the seed coat, air aids in respiration, and sunlight supports later growth after germination.

Seed germination requires specific conditions such as air, water, and the right environment. Sunlight is generally not necessary for germination but is essential for the growth of seedlings after they sprout. Water softens the seed coat and supports the embryo’s development into a plant. Air is crucial for germination, as seeds use the oxygen available in the spaces between soil particles. In Activity 10.2, it is observed that seeds receiving both air and water are more likely to germinate. Excess water can hinder germination by limiting oxygen availability. Seeds demonstrate characteristics of Living Creatures, including growth, which becomes evident during germination.

Growth and Movement in Plants

Plants not only grow but also respond to external factors like sunlight. For instance, a plant’s roots grow downward (gravitropism), while its shoot grows upward toward the light (phototropism).

Activity: Investigating Plant Growth

In this experiment, we place plants in various orientations to see how they grow in response to light and gravity.

BeakerDirection of SunlightPlant OrientationRoot GrowthShoot Growth
AAll directionsUprightDownwardUpward
BAll directionsInvertedDownwardUpward
COne directionUprightDownwardTowards the light

This experiment shows how plants always grow in response to their environment, regardless of how they are placed.

Life Cycle of a Plant

The life cycle of a plant begins with seed germination, followed by growth, flowering, fruiting, and eventually death. This process ensures the continuation of plant life.

Activity: Observing Plant Growth

We plant a bean seed and observe it over three months, recording the various stages of its growth in a table.

DateObservationSketch
Day 1Seeds are sown.(Sketch of seeds)
Day 7Seeds germinate.(Sketch of sprout)
Day 20Leaves appear.(Sketch of leaves)
Day 45Flower buds form.(Sketch of buds)
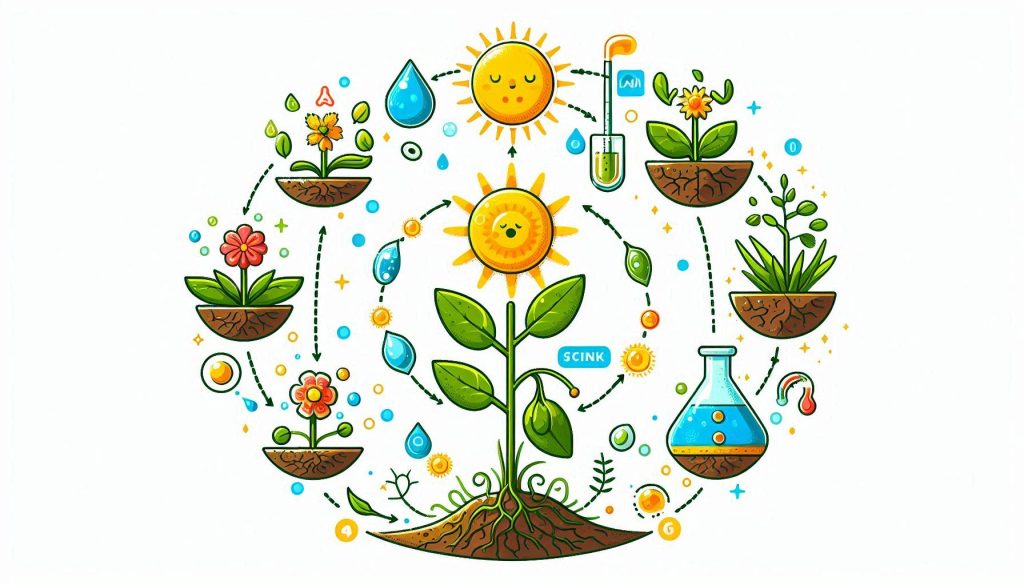
A visual representation of the Life Cycle of a Plant from class 6 science chapter 10 - Living Creatures

Life Cycle of Animals

Just like plants, animals go through a life cycle that includes birth, growth, reproduction, and death. Let’s explore the life cycles of mosquitoes and frogs.

Life Cycle of a Mosquito

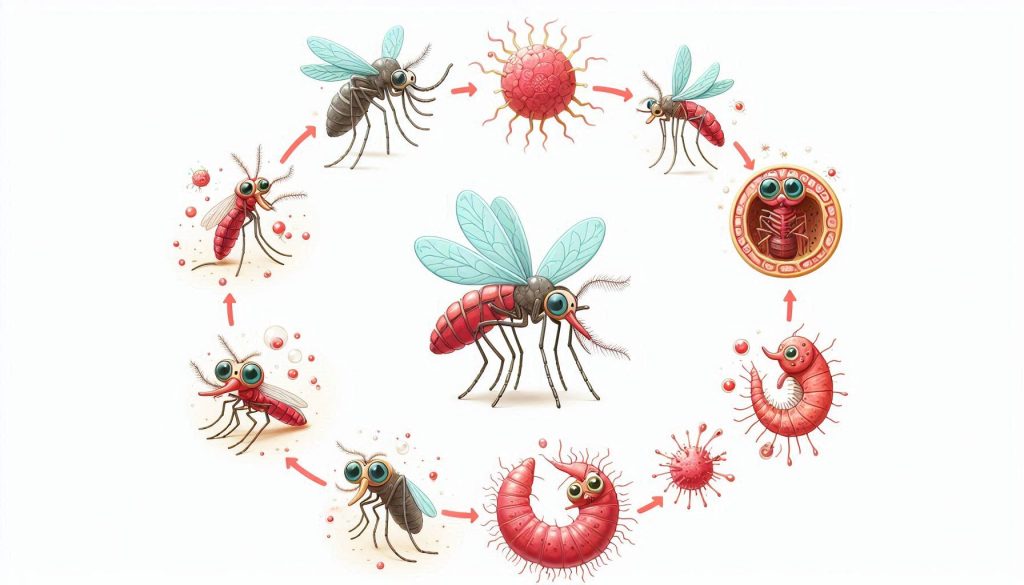
Mosquitoes undergo four life stages: egg, larva, pupa, and adult. Female mosquitoes lay eggs near stagnant water, as the larvae and pupae need water to survive and breathe. Larvae and pupae frequently surface for air since they require oxygen. The larva stage comes after the egg stage and develops into a pupa, which then transforms into an adult mosquito. You can design an activity to observe the sequence of these stages by monitoring larvae and pupae in water containers over time. Preventing stagnant water is essential to stop mosquito breeding, which helps reduce the spread of diseases like malaria, dengue, and chikungunya.

A visual representation of a life cycle of a mosquito from class 6 science chapter 10 - Living Creatures

The silk moth also passes through four life stages—egg, larva, pupa, and adult. Eggs hatch into larvae, which then grow in size. Larvae secrete thread-like material which they wrap around themselves, before changing to pupae. These are the fibers that are used to make silk fabric. In India, the Khadi and Village Industries Commission (KVIC) has set up several centers for silk production.

Life Cycle of a Frog

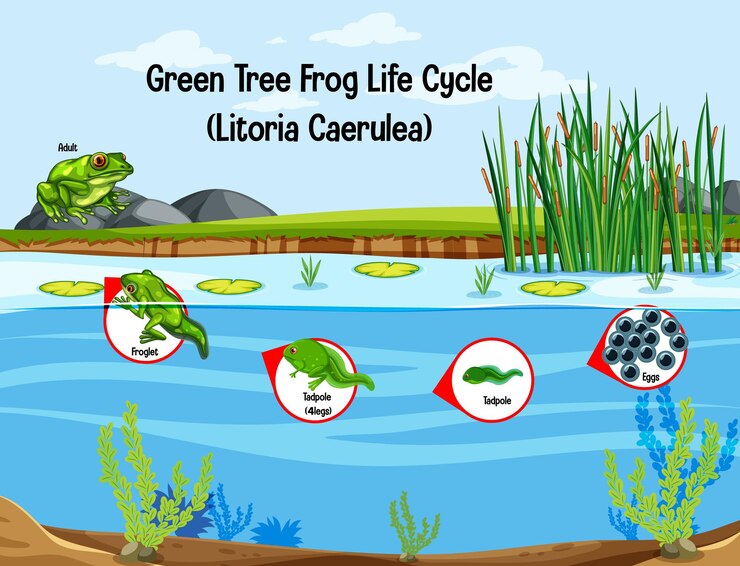
Frogs also undergo a fascinating life cycle that begins with eggs (spawn) laid in water. The eggs develop into tadpoles, which have tails and live in water. As they grow, they develop legs and lose their tails, turning into froglets and finally, adult frogs that can live both on land and in water.

StageDurationDescription
SpawnDay 1Jelly-like egg clusters.
EmbryoDay 3-4Developing within the eggs.
TadpoleDay 7-10Aquatic, tail but no legs.
Froglet8-10 weeksLegs appear, tail shortens.
Adult12-14 weeksFully developed frog.
A visual representation of a life cycle of a frog from class 6 science chapter 10 - Living Creatures

Conclusion: Understanding the Living World

Living Creatures are defined by their ability to move, grow, reproduce, excrete, respond to stimuli, and eventually die. Whether it’s the germination of a seed or the transformation of a tadpole into a frog, life is full of fascinating stages. By understanding these processes, we gain a deeper appreciation for the diversity of life around us.

In conclusion, CBSE Class 6th Science Chapter 10 – Living Creatures: Exploring their Characteristics opens the door to understanding the fundamental differences between living and non-living things. From growth and respiration to reproduction and response to stimuli, this chapter allows students to grasp the essential characteristics that define life. The iPrep Learning Super App provides comprehensive resources, including engaging animated videos, practice questions, and notes, to help students master the concepts of Living Creatures: Exploring their Characteristics. As you continue to explore this chapter, you’ll gain valuable insights into the fascinating world of living beings, making your learning journey both exciting and informative.

Practice questions on Chapter 10 - Living Creatures

Get your free Chapter 10 - Living Creatures practice quiz of 20+ questions & detailed solutions

Practice Now
Science

Chapter 10 - Living Creatures

Learn more about iPrep

Download the App

Watch lectures, practice questions and take tests on the go.

Methods of Separation – Complete Guide For Class 6 Science Chapter 9

Welcome to iPrep, your Learning Super App. Our learning resources for the chapter, Methods of Separation in Everyday Life in Science for Class 6th are designed to ensure that you grasp this concept with clarity and perfection. Whether you’re studying for an upcoming exam or strengthening your concepts, our engaging animated videos, practice questions and notes offer you the best of integrated learning with interesting explanations and examples. 

Introduction to Methods of Separation

In our everyday life, we often encounter mixtures that need to be separated into their components. This chapter on methods of separation from class 6 science takes us through a fascinating journey exploring different methods of separation used in homes, fields, and industries across India. Each method has its unique application, from handpicking stones from grains to using magnets to separate iron nails from sawdust.

Handpicking: The Simplest Method

This section will discusses one of the simplest methods of separation called hand picking. Let’s understand this part of methods of separation with an example.

Malli and Valli’s summer vacation begins with a visit to their Nani’s house in Haryana. They observe their relatives separating small stones and husks from grains using their hands. This method is called handpicking and is based on differences in size, color, and shape.

Activity: Handpicking in Action

  • Steps:
    • Take a handful of roasted peanuts.
    • Rub them between your palms to remove the skin.
    • Blow air to separate the lighter skins from the heavier peanuts.

Handpicking is effective when the components of a mixture are present in small quantities and can be easily distinguished.

Threshing: Separating Grains from Stalks

Now lets continue the example of malli and valli to understand another part of methods of separation called Threshing.

Next, Malli and Valli observe farmers threshing wheat in the fields. Threshing is the process of beating stalks to separate grains. Traditionally, farmers use wooden logs or animals to perform this task, but today, threshing machines are widely used.

Winnowing: Separating Husk from Grains

After threshing, the grains are still mixed with husk. Valli wonders how farmers separate such large quantities of husk. This is done using one of th most commonly used methods of separation called winnowing, where the mixture of grains and husk is thrown into the air. The lighter husk is blown away by the wind, leaving the heavier grains behind.

Activity: Let’s Try Winnowing

  • Materials: A bamboo tray with roasted peanuts and peanut skins.
  • Steps:
    • Hold the tray at an angle and allow the wind to blow away the peanut skins, leaving the peanuts behind.

Winnowing is an effective way of separating lighter and heavier components in mixtures.

A visual representation of winnowing, one of the most common methods of separation in farming

Sieving: Separating Particles by Size

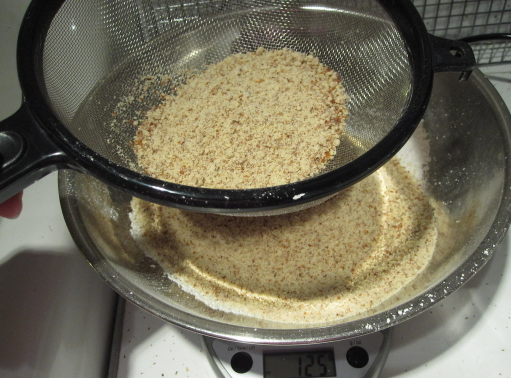
Another example of methods of separation uncovers When Malli and Valli visit Ahmedabad, Valli helps her Mami prepare flour for Meethi Puris. She learns that sieving separates fine flour from larger particles like bran. Sieving works when the components of a solid mixture vary in size.

Activity: Let’s Explore Sieving

  • Materials: A sieve, flour, and bran.
  • Steps:
    • Pour the mixture into the sieve and gently shake it.
    • The fine flour passes through, while the larger bran particles remain.

Sieving is not only used in the kitchen but also at construction sites to separate sand from stones.

image 1221

Evaporation: Obtaining Salt from Seawater

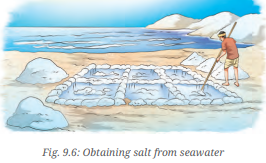
During their trip to Sabarmati Ashram, Malli learns that salt is obtained from seawater through evaporation. Seawater is left in shallow pits to evaporate, leaving behind salt.

Activity: Investigating Evaporation

  • Steps:
    • Take a bowl of water and dissolve salt in it.
    • Leave the solution in a sunny spot and observe as the water evaporates, leaving behind salt crystals.

Evaporation is an important process for obtaining substances dissolved in liquids.

A visual depiction of obtaining salt from the sea water through evaporation, another one of the most commo methods of separation

Salt is obtained from seawater through evaporation. Seawater is placed in shallow pits and exposed to sunlight and air. Over a few days, the water evaporates, leaving behind a solid mixture. This mixture is further purified to obtain common salt.

Activity: How salt can be separated from a salt solution.

In this activity, you dissolve salt in water to form a solution. When drops of this salt solution are spread on dark-colored paper and left to dry, white patches appear. These patches are the salt left behind after the water evaporates. This demonstrates how salt can be separated from a solution through evaporation, as the water disappears into the air, leaving the salt behind.

Sedimentation and Decantation: Separating Insoluble Solids from Liquids

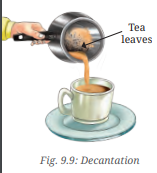
At Dada’s house in Puducherry, Malli learns about sedimentation and decantation. When a heavier insoluble component like tea leaves settles at the bottom of a liquid, the clear liquid can be gently poured out, leaving the sediment behind.

Activity: Sedimentation and Decantation

  • Steps:
    • Pour muddy water into a container and leave it undisturbed.
    • Once the mud settles at the bottom, gently pour the clear water out.

Sedimentation and decantation are common methods for separating solids from liquids when filtration isn’t necessary.

A visual example of another one of the most common methods of separation named as decantation

Filtration: Using Filters to Separate Solids from Liquids

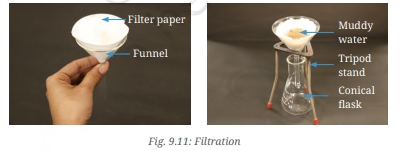
Filtration is another method Malli learns while watching Dada make tea. A filter (like a strainer) is used to separate tea leaves from tea. In other cases, filter paper can be used to separate finer particles.

Activity: Exploring Filtration

  • Steps:
    • Fold a filter paper into a cone and place it in a funnel.
  • Pour muddy water through the funnel and observe how clear water collects in the flask below, while the mud remains on the filter paper.
an example of another one of the most common methods of separation called Filtration

Churning: Extracting Butter from Curd

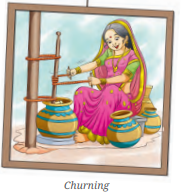
While visiting Madhya Pradesh, Malli observes a dhaba owner churning curd to make buttermilk. Churning separates butter, which is lighter, from the buttermilk left behind.

Activity: Churning in the Kitchen

  • Steps:
    • Using a churner, mix curd until the butter floats to the top.
    • Collect the butter and enjoy the buttermilk!
an example of another one of the most common methods of separation called churning

Magnetic Separation: Separating Magnetic Substances

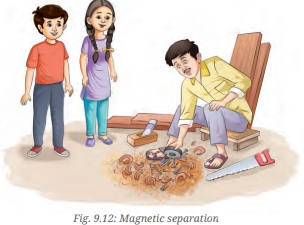
Malli and Valli help a carpenter retrieve iron nails from sawdust using a magnet at their Bua’s house in Shillong. This process, called magnetic separation, is used to separate magnetic substances like iron from non-magnetic materials.

Activity: Magnetic Separation

an example of another one of the most common and fun methods of separation called magnetic separation
  • Steps:
    • Use a magnet to move through a mixture of sawdust and iron nails.
    • Observe how the iron nails stick to the magnet, while the sawdust remains behind.

Summary of Key Methods

  • Handpicking: Separating based on size, color, or shape.
  • Threshing: Beating stalks to separate grains.
  • Winnowing: Using wind to separate lighter components.
  • Sieving: Separating based on particle size.
  • Evaporation: Removing liquid to leave solid components.
  • Sedimentation and Decantation: Settling solids and pouring off liquids.
  • Filtration: Using filters to separate insoluble solids from liquids.
  • Churning: Extracting butter from curd.
  • Magnetic Separation: Using magnets to separate magnetic materials.

These separation techniques are not only vital in our day-to-day activities but also play a crucial role in various industries.

Let’s Conclude

Each one of the methods of separation—handpicking, threshing, winnowing, sieving, evaporation, sedimentation, decantation, filtration, churning, and magnetic separation—has its unique application in our daily lives. Whether in the kitchen, fields, or industries, understanding these methods helps us solve practical problems and makes tasks more efficient.

In conclusion, the Methods of Separation outlined in CBSE Class 8 Science Chapter 9 form an essential part of both our daily activities and industrial processes. From handpicking grains to separating magnetic materials, each method has its own significance in simplifying tasks and enhancing efficiency. Understanding the various methods of separation like sieving, evaporation, filtration, and more helps students apply these techniques in practical situations and prepares them for more advanced scientific concepts.

As you continue exploring Methods of Separation in your Class 8 Science studies, remember that these techniques are not just theoretical but have real-life applications that we encounter every day. Be it in the kitchen, the field, or the laboratory, mastering these methods is key to understanding the fundamental ways in which we organize and purify substances.

For a deeper dive into Methods of Separation, iPrep offers engaging videos, practice exercises, and comprehensive notes that can enhance your learning experience, ensuring you’re well-prepared for both exams and practical applications.

Practice questions on Chapter 9 - Methods OF Separation

Get your free Chapter 9 - Methods OF Separation practice quiz of 20+ questions & detailed solutions

Practice Now
Science

Chapter 9 - Methods OF Separation

Learn more about iPrep

Download the App

Watch lectures, practice questions and take tests on the go.

Temperature and its Measurement – Complete Guide For Class 6 Science Chapter 7

Welcome to iPrep, your Learning Super App.  Our learning resources for the chapter, Temperature and its Measurement in Science for Class 6th are designed to ensure that you grasp this concept with clarity and perfection. Whether studying for an upcoming exam or strengthening your concepts, our engaging animated videos, practice questions and notes offer you the best-integrated learning with interesting explanations and examples. 

Objectives Of Learning Temperature and its Measurement

The objectives of learning CBSE Class 6th Science Chapter 7 – Temperature and its Measurement are to help students understand the concept of temperature, how it is measured, and the importance of accurate measurement using various instruments like clinical and laboratory thermometers. By the end of this chapter, students will be able to differentiate between hot and cold objects, understand the use of different temperature scales, and gain practical knowledge through hands-on activities related to measuring temperature in everyday life and scientific experiments.

Introduction to Temperature

According to the chapter Temperature and its Measurement, Temperature plays a key role in our everyday lives, influencing everything from how we feel to the behavior of objects around us. It measures how hot or cold something is, and while we can sometimes estimate temperature by touch, scientific accuracy requires the use of thermometers. This chapter explores different ways of measuring temperature and the instruments we use for this purpose.

Hot or Cold?

As stated in the chapter – Temperature and its Measurement, We often judge how hot or cold something is just by touching it. For instance, the tap water in summer feels warmer than the cool water stored in an earthen pot. But can we always rely on our sense of touch? An investigation helps us understand this better.

Activity: Investigating Hot and Cold

In this activity, we will explore how reliable our sense of touch is when it comes to detecting temperature.

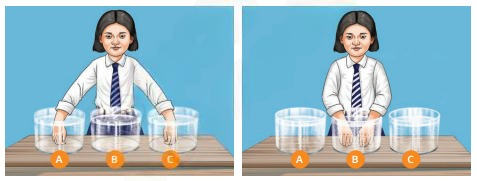
  • Materials Needed: Three containers labeled A, B, and C, warm water in A, tap water in B, and ice-cold water in C.
  • Steps:
    • Dip your right hand in warm water (A) and your left hand in ice-cold water (C) for 1–2 minutes.
    • Then place both hands in the tap water (B) and observe what each hand feels.

You’ll notice that your right hand may feel the water in container B as cool, while your left hand may feel it as warm. This shows that our sense of touch can be misleading.

A visual representation of activity around temperature and its measure form class 6 science chapter 7

What is Temperature?

Temperature is the scientific measure of how hot or cold something is. A higher temperature means something is hotter, while a lower temperature means it’s cooler. To measure temperature accurately, we use thermometers.

There are two main types of thermometers:

  • Clinical thermometers: Used for measuring body temperature.
  • Laboratory thermometers: Used for various scientific experiments.

Measuring Temperature

Clinical Thermometer

A clinical thermometer is a device used to measure body temperature. Nowadays, most clinical thermometers are digital and use heat sensors, eliminating the need for mercury, which is toxic.

  • How to Use a Clinical Thermometer:
    1. Wash the tip of the thermometer with soap and water.
    2. Place the thermometer under the tongue and wait for the beep or light.
    3. Read the temperature displayed on the digital screen.

The temperature is measured in degrees Celsius (°C). The normal human body temperature is around 37.0 °C, though slight variations are normal.

A visual of a thermometer form class 6 science chapter 7 - Temperature and its measurement

Precautions while using a thermometer:

  • Wash the thermometer before and after use.
  • Avoid wetting the digital display.
  • Do not hold the thermometer by its tip.

The normal human body temperature is typically considered to be 37.0 °C, but slight variations are common. As mentioned in the chapter Temperature and its Measurement, Factors such as age, time of day, and activity levels influence body temperature. A person’s temperature might be slightly higher or lower than 37.0 °C, as this value is an average based on many healthy individuals. The temperature of human beings usually ranges between 35 °C and 42 °C. For children or elderly individuals, digital thermometers can be used, often showing a temperature of 0.5 °C to 1 °C lower when measured in the armpit.

There are different scales for measuring temperature, such as Celsius (°C), Fahrenheit (°F), and Kelvin (K). On the Fahrenheit scale, the normal body temperature of 37.0 °C is equivalent to 98.6 °F. The Kelvin scale, commonly used in scientific work, is the SI unit of temperature, and the temperature in Kelvin can be found by adding 273.15 to the Celsius temperature.

Temperature scale names, like Celsius, Fahrenheit, and Kelvin, begin with capital letters. However, the word “degree” starts with a lowercase letter, except in the case of Kelvin, where no degree sign is used. When writing temperature, a space is left between the number and the unit, and the plural form “degrees” is used for temperatures above one degree.

These scales are named in honor of the scientists who developed them.

Laboratory Thermometer

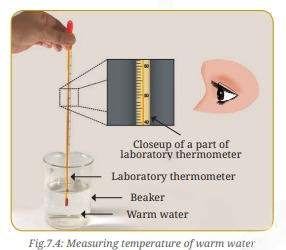
Laboratory thermometers are used for scientific experiments. According to the chapter Temperature and its Measurement, they are more sensitive than clinical thermometers and can measure temperatures ranging from –10 °C to 110 °C. These thermometers often contain colored alcohol or mercury.

A visual of a Laboratory Thermometer from class 6 science chapter 7 - Temperature and its measurement
Activity: Finding the Range of a Laboratory Thermometer

To find the range:

  1. Observe the thermometer.
  2. Note the lowest and highest temperatures it can measure.
    • The thermometer in the textbook example has a range from –10 °C to 110 °C.
Activity: Calculating the Smallest Value a Thermometer Can Read

Find the smallest temperature difference that can be measured using a laboratory thermometer by:

  1. Observe the thermometer.
  2. Counting the number of divisions between the larger marks (e.g., between 0 °C and 10 °C).
  3. Dividing the temperature difference (10 °C) by the number of smaller divisions (10 divisions).

This tells us that each small division measures 1 °C.

Using a Laboratory Thermometer

As stated in the chapter Temperature and its Measurement – When using a laboratory thermometer, follow these steps:

  1. Ensure the bulb does not touch the sides or bottom of the container.
  2. Hold the thermometer vertically.
  3. Read the temperature while the thermometer is still immersed in the substance being measured.
Activity: Measuring the Temperature of Warm Water

To measure the temperature of warm water:

  1. Immerse the thermometer in the water and wait until the liquid column stops rising.
  2. Record the temperature while the thermometer is still in the water, as the reading will drop once it is removed.
A visual representation of how to measure the temperature of hot water from class 6 science chapter 7 - Temperature and its Measurement

Air Temperature

Air temperature is commonly measured using thermometers hung on walls, such as the ones found in classrooms, hospitals, and laboratories. Maximum and minimum air temperatures are recorded in weather reports to track climate changes.

The maximum and minimum temperatures do not stay the same each day, as weather depends on various factors. Typically, temperatures rise as summer approaches and fall during the winter season.

Temperature Scales

There are three main temperature scales:

  1. Celsius (°C): Used in most scientific studies.
  2. Fahrenheit (°F): Still in use in some countries like the USA.
  3. Kelvin (K): The SI unit for temperature, is used in scientific research.

To convert Celsius to Kelvin, use the formula:

Temperature (K) = Temperature (°C) + 273.15

Measuring Extremes of Temperature

As stated in the chapter – Temperature and its Measurement, To measure extreme temperatures, such as boiling water or melting ice, laboratory thermometers are used. It is essential to note that the temperatures of boiling water and melting ice remain constant during these processes.

Activity: Comparing Temperatures

Compare the temperature readings of boiling water recorded by different students in a lab setup:

NameBoiling Water Temp (°C)
Phiban97.8
Shemphang98.0
Onestar97.9

The slight differences in readings could result from improper handling of the thermometer.

Let’s Conclude

In conclusion, CBSE Class 6th Science Chapter 7 – Temperature and its Measurement offers a comprehensive understanding of how we measure and interpret temperature in various situations. From investigating how our sense of touch can be misleading, to learning about clinical and laboratory thermometers, this chapter equips students with essential knowledge. By mastering the different methods and instruments used for temperature measurement, learners can enhance their understanding of this critical concept. With iPrep, your Learning Super App, grasping the content of CBSE Class 6th Science Chapter 7 – Temperature and its Measurement becomes an engaging and interactive experience. Dive into the learning resources provided and ensure you’re fully prepared to excel in this chapter!

Practice questions on Chapter 7 - Temperature and its Measurement

Get your free Chapter 7 - Temperature and its Measurement practice quiz of 20+ questions & detailed solutions

Practice Now
Science

Chapter 7 - Temperature and its Measurement

Learn more about iPrep

Download the App

Watch lectures, practice questions and take tests on the go.

Measurement of Length and Motion – Complete Guide for Class 6 Science Chapter 5

a visual representation of the measurement of length and motion from class 6 science

Welcome to iPrep, your Learning Super App. Our learning resources for the chapter, Measurement of Length and Motion in Science for Class 6th are designed to ensure that you grasp this concept with clarity and perfection. Whether studying for an upcoming exam or strengthening your concepts, our engaging animated videos, practice questions and notes offer you the best-integrated learning with interesting explanations and examples. 

Objectives Of Learning The Chapter – Measurement of Length and Motion

The objective of learning the chapter “Measurement of Length and Motion” in Class 6 Science is to introduce students to the fundamental concepts of measuring length and understanding different types of motion. Through this chapter, students will explore the need for standard units of measurement, learn how to accurately measure objects using appropriate tools, and recognize various forms of motion, such as linear, circular, and oscillatory. By mastering these concepts, students will develop essential skills that will help them describe and quantify the physical world around them.

Introduction: A Journey with Deepa
Meet Deepa, a curious 11-year-old girl from Haryana. Her need for a new school uniform sparked an interesting discussion about measurements when her mother asked for two meters of cloth, and later requested the tailor to add “char angula” to the length. This simple event led Deepa and her friends to explore the fascinating world of measurement.

How Do We Measure?

As mentioned in the chapter Measurement of Length and Motion– For centuries, humans have used body parts to measure length. Farmers use strides, and in Deepa’s case, her mother used “angula” (finger width) to instruct the tailor.

Activity: Measuring with Body Parts

Deepa and her friends decided to measure the length of their classroom table using their handspans. They soon realized that the results varied because their hand sizes differed, leading to an insightful conclusion: personal units, such as handspan or foot, can vary greatly between individuals.

NameNumber of Handspans
AnishSlightly more than 13
Padma13
TasneemSlightly less than 13
DeepaBetween 13 and 14
Hardeep14

This exercise showed the need for standard units of measurement that don’t vary from person to person.

Standard Units of Measurement

According to the chapter Measurement of Length and Motion, to avoid confusion, standard units of measurement, like the International System of Units (SI), were developed. The SI unit for length is the meter (symbol: m).

  • 1 kilometre (km) = 1000 metres
  • 1 metre (m) = 100 centimetres
  • 1 centimetre (cm) = 10 millimetres

Would it be practical to measure the distance between two cities using a meter? Or the thickness of a book page using a kilometer? The SI system provides flexibility with units like centimeters for smaller lengths and kilometers for larger distances.

A visual of a 15 CM scale from class 6 math chapter 5 - Measurement of Length and Motion

Correct Way to Measure Length

As stated in the chapter Measurement of Length and Motion, when measuring length, it is essential to use the correct scale and technique.

  • Use the correct scale: For example, a 15-cm ruler is ideal for measuring a pencil, while a meter scale or tape is needed for larger objects.
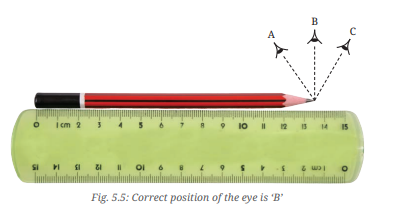
  • Position the scale correctly: Place the scale along the object’s length and ensure your eye is level with the scale to avoid parallax errors.
  • Handling broken scales: If a scale’s zero mark is broken, use another clear mark, and subtract the reading from the second end.
  • When measuring length, it’s important to use the appropriate scale based on the object. For small objects like a pencil, a 15-cm scale is suitable, while a meter scale or measuring tape is used for larger items like a room’s height or the girth of a tree. Flexible tape is best for measuring curved surfaces.
a visual of the correct way to measure length from class 6 science chapter 5 - Measurement of Length and Motion

| Key Tip: Visually challenged students use scales with raised markings to measure by touch. |

Measuring Curved Lines

Based on the chapter Measurement of Length and Motion, Measuring straight objects is easy, but how do we measure curved objects like arches or strings of light? Deepa’s friend Anish solved this by using a thread to follow the curve and then measuring the thread’s length with a meter scale.

Activity: Measuring Curved Objects

Using a flexible measuring tape or thread is the most practical way to measure curved lines, like the lights on a verandah arch.

Describing Position and Reference Points

When Deepa’s teacher planned a school trip to a garden, Deepa and her friends debated whether the garden was closer to the school. They learned that distances depend on the reference point. For example, if everyone measured from the bus stand, their observations would be consistent.

  • Reference Point: A fixed object or point used to describe the position of another object.

This concept was further reinforced when Padma used kilometer stones along a road to track how close she was to Delhi. The kilometer stones indicated her position relative to Delhi as the reference point.

Motion: Understanding Movement

An object is in motion if its position changes concerning a reference point over time. For example, as Deepa sat in a moving bus, she noticed that while the passengers appeared to be at rest inside the bus, they were actually in motion relative to objects outside.

| Tip: To determine whether an object is moving, check if its position changes relative to a fixed reference point. |

Types of Motion

Motion can take various forms:

  1. Linear Motion: Motion along a straight line.
    Example: A car moving on a straight road or a marching parade.
  2. Circular Motion: Motion along a circular path.
    Example: The motion of an eraser tied to a thread and whirled in a circle, or the movement of a merry-go-round.
  3. Oscillatory Motion: Motion that moves back and forth along a fixed path.
    Example: A swing moving to and fro, or an eraser suspended by a thread and allowed to oscillate.

Activity: Exploring Types of Motion

Deepa and her friends categorized motions they observed in a park:

ObjectLinear MotionCircular MotionOscillatory Motion
SwingMoving to and fro
Bicycle WheelRotating
TrainMoving straight

Periodic Motion

Periodic motion refers to motion that repeats at regular intervals. Both circular and oscillatory motions are periodic, as they repeat their paths after a fixed interval of time.

Key Takeaways

  • SI Units: The standard unit for measuring length is the meter (m).
  • Reference Point: Position is described as a fixed reference point.
  • Motion: An object is in motion if it changes its position concerning a reference point.
  • Types of Motion: Linear, circular, and oscillatory motions are all common in our surroundings.

Conclusion

Understanding how to measure length and describe motion is essential for understanding the physical world. Whether it’s measuring the height of a tree, tracking your journey on the road, or identifying the type of motion in everyday objects, mastering these concepts opens the door to countless applications in science and beyond.

In conclusion, the chapter “Measurement of Length and Motion” for CBSE Class 6th Science introduces fundamental concepts that are essential for understanding the physical world around us. From learning about standard units of measurement like meters to recognizing different types of motion—linear, circular, and oscillatory—this chapter lays the foundation for more complex scientific topics. With iPrep’s engaging resources, such as animated videos, practice exercises, and detailed notes, mastering the chapter “Measurement of Length and Motion” becomes easier and more enjoyable. So, dive deeper into the concepts, and let the iPrep Learning Super App guide you through the fascinating journey of “Measurement of Length and Motion.

Practice questions on Chapter 5 - Measurement of Length and Motion

Get your free Chapter 5 - Measurement of Length and Motion practice quiz of 20+ questions & detailed solutions

Practice Now

Science

Chapter 5 - Measurement of Length and Motion

Learn more about iPrep

Download the App

Watch lectures, practice questions and take tests on the go.

Exploring Magnets – Complete Guide For Class 6 Science Chapter 4

A visual representation of exploring the concept of magnets form class 6 math chapter 4 - Exploring Magnets

Welcome to iPrep, your Learning Super App. Our learning resources for the chapter, Exploring Magnets in Science for Class 6th are designed to ensure that you grasp this concept with clarity and perfection. Whether studying for an upcoming exam or strengthening your concepts, our engaging animated videos, practice questions and notes offer you the best-integrated learning with interesting explanations and examples. 

Objectives of Learning The Chapter – Exploring Magnets

The objective of learning the chapter Exploring Magnets in Class 6 Science is to introduce students to the fundamental properties and behavior of magnets. Through this chapter, students will understand the differences between magnetic and non-magnetic materials, learn about magnetic poles, and explore how magnets are used for navigation and other practical applications. Additionally, the chapter aims to develop curiosity and hands-on learning by engaging students in experiments that demonstrate concepts like attraction, repulsion, and the passage of magnetic fields through non-magnetic materials. Ultimately, Exploring Magnets seeks to build a strong foundational understanding of magnetism and its relevance in everyday life.

Introduction: A Tale of Navigation

Reshma, a curious young girl from Kerala, was stuck in her story about sailors lost in a storm. How could they navigate without visible stars? This led her to discover that sailors once used a device called a magnetic compass for navigation, sparking her interest in magnets.

What Are Magnets?

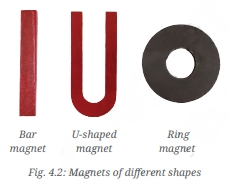
Magnets have been used for centuries, starting with naturally occurring magnets known as lodestones. Today, magnets are made from various materials and come in different shapes. Whether they are bar magnets, U-shaped magnets, or ring magnets, magnets have the unique property of attracting certain materials.

A visual representation of magnets of different shapes from class 6 science chapter 4 - Exploring Magnets

Magnetic and Non-Magnetic Materials

As stated in the chapter Exploring Magnets, Magnets attract some materials but not others. These materials are classified as magnetic or non-magnetic.

Activity:  Identifying Magnetic Materials

Students are asked to predict which objects will stick to a magnet and record their observations in a table.

ObjectMaterialPredictionAttracted by Magnet (Yes/No)
PencilWoodNoNo
EraserRubberNoNo
NailIronYesYes

Magnetic materials like iron, nickel, and cobalt are attracted to magnets, while non-magnetic materials like wood and plastic are not.

Poles of a Magnet

Magnets have two poles—North and South. The poles are where the magnetic force is strongest.

Activity: Observing Magnetic Poles

Students spread iron filings over a paper and observe how they accumulate near the poles of the magnet. No matter how a magnet is divided, both North and South poles always remain, even in the smallest piece of a magnet.

Finding Directions with Magnets

As per the chapter – Exploring Magnets, One of the most intriguing properties of magnets is their ability to find directions.

Activity: Using a Bar Magnet to Find Directions

By suspending a bar magnet horizontally, students observe that it always comes to rest in the north-south direction. This activity demonstrates that Earth itself behaves like a giant magnet, allowing magnets to point towards the poles.

A magnetic compass, with a freely rotating needle, uses this property to help find directions. As mentioned in the chapter exploring Magnets, the needle always aligns along the north-south axis, with the North-seeking end often painted red.

A freely suspended magnet aligns itself along the north-south direction due to Earth’s magnetic field, with the North-seeking end pointing north and the South-seeking end pointing south. This property is unique to magnets, as a non-magnetic iron bar will rest in any direction. This provides a method to test if a metal is a magnet. Based on this principle, the magnetic compass was developed to find directions. The compass contains a needle-shaped magnet that rotates freely and settles in the north-south direction, helping to determine all directions by aligning the compass dial accordingly.

Constructing a Simple Compass

Activity: Making a Homemade Magnetic Compass

Students can create their magnetic compass using simple materials like a cork, a needle, and water. By rubbing the needle with a bar magnet, it becomes magnetized. Floating the needle on a cork in water allows the needle to align with the Earth’s magnetic field, just like a compass.

Attraction and Repulsion Between Magnets

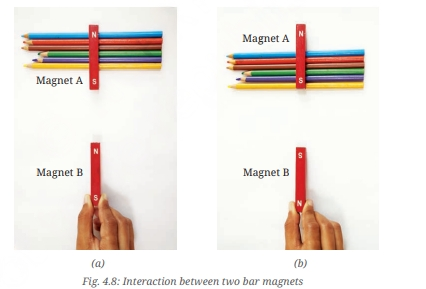
Magnets not only attract objects but can also repel each other depending on the orientation of their poles.

Activity: Investigating Magnetic Interactions

By bringing the North poles of two magnets close together, students observe that the magnets repel each other. Similarly, like poles repel, while unlike poles (North-South) attract.

a visual of the activity - Investigating Magnetic interactions from class 6 science chapter 4- exploring magnets

Magnetic Effects Through Non-Magnetic Materials

Magnets can exert their influence even through non-magnetic materials like wood, cardboard, or plastic.

Activity: Testing Magnetic Influence

Students experiment by placing different non-magnetic materials between a compass needle and a magnet, observing that the compass still deflects. This shows that magnetic fields can pass through non-magnetic substances.

MaterialEffect on Compass Needle
WoodNo change
CardboardNo change
PlasticNo change
GlassNo change

Fun with Magnets: Experiments and Games

Magnets are not just for scientific discovery; they can be used for fun and games!

Magnetic Garland and Maze

By placing steel balls in a maze and using a magnet from below, students can move the balls without touching them directly. Similarly, they can lift steel clips from water using a magnet, showcasing the fascinating power of magnetic forces.

Magnet Cars

Two cars with magnets placed in them will either move toward or away from each other, depending on whether the poles are attracting or repelling.

Magnet Safety and Care

Magnets need to be handled with care to maintain their strength.

  • Store magnets in pairs with unlike poles facing each other.
  • Avoid dropping, hammering, or heating magnets as these actions can weaken their magnetic properties.
  • Keep magnets away from devices like mobile phones or remote controls.

Conclusion

Magnets are everywhere—from the needle of a compass pointing north to the magnetic locks on your school bag. They can attract or repel, find directions, and even influence objects without direct contact. By exploring magnets, we uncover the wonders of invisible forces and their applications in everyday life.

In conclusion, the chapter Exploring Magnets in CBSE Class 6 Science Chapter 4 has introduced us to the fascinating world of magnets. From understanding their unique properties, like attraction and repulsion, to discovering their practical uses, such as navigation through compasses, magnets play a vital role in both science and daily life. By engaging in various activities and experiments, students can deepen their understanding of how magnets interact with different materials and explore the forces they exert. Whether you’re learning about magnetic poles or creating your compass, Exploring Magnets offers an exciting journey into the invisible forces that shape our world.

So, as you delve deeper into the topic of Exploring Magnets, remember to enjoy the experiments while also handling magnets with care. With iPrep’s interactive learning resources, you’ll master every concept of this chapter with ease!

Summary

Let’s now summarize the chapter – Exploring magnets

  • Magnets have two poles, North and South, and exert forces of attraction or repulsion.
  • Magnetic materials are attracted to magnets, while non-magnetic materials are not.
  • A suspended magnet always aligns in the north-south direction, a property used in compasses.
  • Magnetic fields can pass through non-magnetic materials like wood and plastic.
  • Like poles repel, while unlike poles attract.
  • Magnets are fun for experiments, but they must be handled with care.

Practice questions on Chapter 4 - Exploring Magnets

Get your free Chapter 4 - Exploring Magnets practice quiz of 20+ questions & detailed solutions

Practice Now
Science

Chapter 4 - Exploring Magnets

Learn more about iPrep

Download the App

Watch lectures, practice questions and take tests on the go.

Mindful Eating: A Path to a Healthy Body – Complete Guide For Class 6 Science Chapter 3

Welcome to iPrep, your Learning Super App. Our learning resources for the chapter, Mindful Eating: A Path to a Healthy Body in Science for Class 6th are designed to ensure that you grasp this concept with clarity and perfection. Whether studying for an upcoming exam or strengthening your concepts, our engaging animated videos, practice questions and notes offer you the best-integrated learning with interesting explanations and examples. 

Objectives of Learning Mindful Eating

Mindful eating is more than choosing healthy foods; it’s a holistic approach that encourages awareness of our eating habits. By practicing mindful eating, students will learn to appreciate the origins of their food, recognize the importance of balance and variety in their diet, and understand how their choices impact their health and the environment. This chapter aims to equip students with the knowledge and skills to make informed food choices, fostering lifelong habits that promote well-being. Through engaging activities and discussions, we will explore how mindful eating contributes to a healthier body and a sustainable future.

Who is Healthy?

A well-known saying from ancient wisdom asks, “Who is healthy?” The answer lies in consuming food that is wholesome, moderate in quantity, and suitable for the season, time, and place. This sets the foundation for understanding how mindful eating contributes to a healthy body.

What Do We Eat?

Food is an essential component of our daily life. It not only nourishes our bodies but also reflects the diverse cultures across the country.

Activity:  Let Us Record Our Food

Students are encouraged to track their food intake over a week and note the variety of items consumed. This exercise leads to questions like:

  • Do we eat the same kind of food every day?
  • What similarities and differences exist between our diet and our friends’ diets?

These observations help us understand the diversity in food choices across various states.

Food in Different Regions

India is a land of cultural diversity, which is reflected in its food habits. Each state has traditional foods based on locally grown crops.

Activity: Exploring Food Diversity

Students are encouraged to explore the food habits in different regions of India. For instance, in Punjab, traditional foods include makki di roti and sarson da saag, while Karnataka is known for idli, dosa, and sambhar.

StateCrops GrownTraditional FoodBeverages
PunjabMaize, wheat, pulsesMakki di roti, sarson da saagLassi, buttermilk
KarnatakaRice, ragi, uradIdli, dosa, sambhar, ragi muddeCoffee, tea
ManipurRice, bamboo, soybeanRice, eromba, singju, kangsoiBlack tea

How Cooking Practices Have Changed Over Time

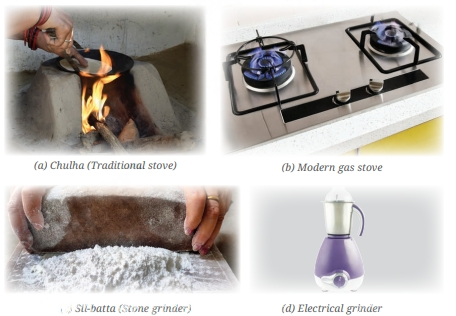
Food preparation methods have evolved with time. From traditional chulhas to modern gas stoves, cooking practices have undergone a significant transformation.

Activity: Interviewing the Elderly

Students are encouraged to interview elderly people and learn how cooking methods and food habits have changed over the years. For example, earlier grinding was done using a sil-batta, but today, electric grinders have replaced it.

Traditional ToolModern Tool
Chulha (stove)Gas stove
Sil-batta (grinder)Electrical grinder
a visual comparison of traditional and modern tools for cooking in India from class 6 science chapter 3- Mindful Eating

What Are the Components of Food?

Food consists of several components, each serving a specific purpose for the body. These include carbohydrates, fats, proteins, vitamins, and minerals.

Carbohydrates and Fats: Energy-Giving Foods

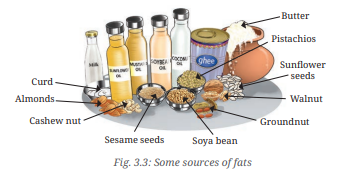
Carbohydrates are essential for energy, and common sources include wheat, rice, potatoes, and fruits like bananas and mangoes. Fats provide stored energy, with sources such as nuts, seeds, butter, and oils.

Sources of CarbohydratesSources of Fats
Wheat, rice, potatoesNuts, butter, oils

AD 4nXfZQzH nd xtLuvlwF RQPaMtB7w0Lppqkcmz6tLady4U5NTiliVHCKuh3jORoeHQPRh7HkkpwZaKBd1fQ16yCxtSI0BCjFdCAPEO976rMd3qrpIfBBFBdqMg61yiJsbTt 6Qe3r4ArPiEhm Qo dbnLGH?key=zi3oe6tLWl2LpzQFv eCTw

a visual representation of some sources of fats from class 6 science chapter 3 - Mindful Eating

Proteins: Body-Building Foods

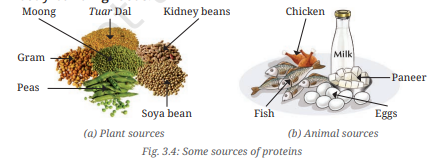
Proteins help in growth and repair. Plant-based sources include pulses, beans, and nuts, while animal-based sources include milk, eggs, fish, and meat.

Plant SourcesAnimal Sources
Pulses, beans, nutsMilk, eggs, meat
Come sources or proteins from class  6 science chapter 3- Mindful Eating

Nutrients That Protect Our Body

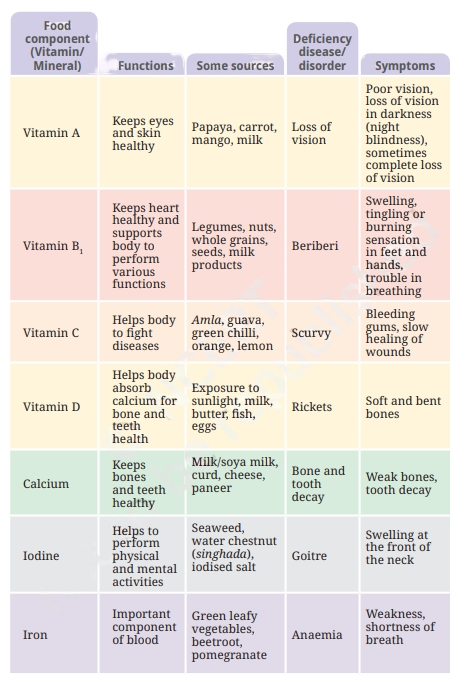
Vitamins and minerals protect the body from diseases. For example, vitamin C prevents scurvy, while iodine prevents goiter.

nutrients that protect our body mindful eating class 6 science transformed

Nutrients are essential components of food that provide energy, support growth, aid in body repair, and protect us from diseases. The major nutrients include carbohydrates, proteins, fats, vitamins, and minerals. Vitamins and minerals, known as protective nutrients, are crucial for maintaining health, despite being required in small amounts. They are found in foods like milk, vegetables, fruits, and whole grains. Cooking can cause some nutrient loss, such as vitamin C, making it beneficial to include raw fruits and vegetables in our diet.

Dietary fibers, or roughage, aid digestion by helping the body eliminate undigested food, while water assists in nutrient absorption and waste removal. A balanced diet rich in local, plant-based foods, combined with sufficient water intake, is vital for maintaining health and benefiting the environment.

Balanced Diet: A Key to Healthy Living

A balanced diet contains all the essential nutrients in the right amounts. It varies according to age, gender, and activity levels.

Activity: Checking for a Balanced Diet

Students are asked to evaluate their weekly food consumption and determine whether it contains all necessary nutrients. A balanced diet should include carbohydrates, proteins, fats, vitamins, minerals, roughage, and water.

Between potato wafers and roasted chana, the potato wafers can be labeled as junk food. Potato wafers have high calories due to their sugar and fat content but contain low amounts of essential nutrients like proteins, vitamins, minerals, and dietary fibers. Frequent consumption of such foods can lead to obesity and various health issues. In contrast, roasted chana is a healthier option as it is rich in proteins and other nutrients. Eating a balanced diet, avoiding junk food, and choosing nutrient-rich options like roasted chana is important for maintaining good health, as health is essential for a happy life.

Testing Food for Nutrients

Certain nutrients in food, like starch, fats, and proteins, can be detected using simple tests.

Food ItemStarch TestFat TestProtein Test
PotatoYesNoNo
PeanutsYesYesYes

In the investigation of food items for nutrients, the test for starch involves applying an iodine solution to various foods like potatoes, bread, and rice. A blue-black color indicates the presence of starch. The fats test requires wrapping food in paper and pressing it. An oily patch on the paper shows the presence of fats, as seen in foods like butter or oil. For proteins, food is mixed with copper sulfate and caustic soda in a test tube. A violet color signifies the presence of proteins, as found in foods like peanuts.

These tests show that many foods contain multiple nutrients, such as peanuts, which have both proteins and fats. This highlights the diversity of nutrients in everyday foods, helping us understand their contribution to a balanced diet.

Millets: Nutrition-Rich Cereals

Millets like jowar, bajra, and ragi are rich in nutrients and have been part of the Indian diet for centuries. They are excellent sources of vitamins, minerals, and dietary fiber.

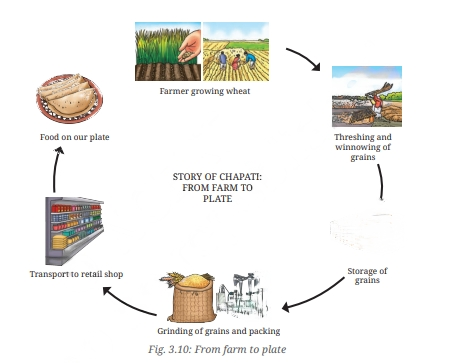
Food Miles: From Farm to Plate

Food miles refer to the distance food travels from the farm to our plate. Reducing food miles helps lower pollution and supports local farmers.

A visual of the food miles from farm to plate from Mindful eating - a chapter of class 6 science

Let’s Conclude

The journey to a healthy body begins with mindful eating. Consuming a balanced diet, incorporating traditional foods like millet, and reducing food wastage are essential steps toward achieving good health. By understanding where our food comes from and making conscious choices, we can lead a healthier, more sustainable lifestyle.

In summary, Mindful Eating: A Path to a Healthy Body emphasizes the crucial role that our food choices play in our overall health. By engaging with the concepts presented in CBSE Class 6th Science Chapter 3 – Mindful Eating: A Path to a Healthy Body, we learn the importance of consuming a balanced diet rich in essential nutrients. Reflecting on our food habits, understanding regional cuisines, and recognizing the nutritional value of diverse food items are vital for promoting wellness.

As we continue our journey through this chapter, let’s commit to making mindful choices that foster a healthier body and contribute to our happiness. Remember, every meal is an opportunity to nourish ourselves—let’s make it count!

Practice questions on Chapter 3- Mindful Eating: A Path to a Healthy Body

Get your free Chapter 3- Mindful Eating: A Path to a Healthy Body practice quiz of 20+ questions & detailed solutions

Practice Now
Science

Chapter 3- Mindful Eating: A Path to a Healthy Body

Learn more about iPrep

Download the App

Watch lectures, practice questions and take tests on the go.

Diversity in the Living World – Complete Guide for Class 6th Science Chapter 2 

Welcome to iPrep, your Learning Super App. Our learning resources for the chapter, Diversity in the Living World in Science for Class 6th are designed to ensure that you grasp this concept with clarity and perfection. Whether you’re studying for an upcoming exam or strengthening your concepts, our engaging animated videos, practice questions and notes offer you the best of integrated learning with interesting explanations and examples. 

Understanding the vast diversity of plants and animals around us is crucial for appreciating the balance of life on Earth. This chapter takes us through various activities and observations to deepen our understanding of biodiversity and its importance.

Objectives Of Learning Diversity in the Living World

The primary objective of the chapter Diversity in the Living World is to provide students with a comprehensive understanding of the variety of living organisms that inhabit our planet. Through this chapter, students will explore the fundamental concepts of biodiversity, including the classification and grouping of plants and animals based on their unique characteristics. By engaging in hands-on activities and observations, learners will develop critical thinking skills and a deeper appreciation for the natural world. Ultimately, this chapter aims to instill a sense of responsibility towards conservation and encourage students to recognize the significance of preserving the rich diversity of life on Earth.

Introduction: A Nature Walk

The chapter Diversity in the Living World, begins with a vivid description of a nature walk. Dr. Raghu, a scientist, and Maniram Chacha, a local expert on plants and animals, join the students for an educational walk to observe nature’s diversity. Dr. Raghu explains the beauty and variety of the natural world, urging students to respect living creatures and observe them. Along the way, the students notice various plants and animals, from butterflies and birds to large trees and grasses.

Activity: Let us explore and record
Plan a nature walk and observe the different plants, insects, birds, and other animals around you. Keep a record of weather conditions and your observations.

During the walk, the students observe:

  • Plants such as grasses, bushes, and trees.
  • Animals like birds, monkeys, and butterflies.

Table: Observations of Different Plants

S. No.Local Name of PlantStemLeaves (Shape/Arrangement)FlowersOther Observations
1Common grassSoft and thinA single leaf grows alternativelyGreen leavesNone
2TulsiHard and thinOpposite arrangement of leavesPinkish purpleNone
3HibiscusHardNone
4NeemHard and thickSmooth surface leavesNone

Dr. Raghu explains that each bird has a unique chirp, exemplifying the diversity of nature. Maniram Chacha imitates bird calls, and the students enthusiastically follow him. This encourages students to observe plants and animals around them, prompting them to record and share their observations.

Diversity in Plants and Animals

As per the chapter Diversity in the Living World, Nature is filled with diverse plants and animals that differ in height, structure, color, and behavior. The students are encouraged to compare the similarities and differences among the plants they observed.

Activity: Appreciating Diversity
Take time to observe your surroundings and identify plants and animals. Draw them on the blackboard and discuss how many varieties exist.

Table: Observations of Different Animals

Name of AnimalHabitatFoodMovementOther Observations
CrowTreeInsectsFlies and walksCarries a twig in its beak
AntSoilLeaves, seedsCrawlsHas six legs
CowGrasslandsGrassesWalksNone

Students note how some animals live on land, others live in trees, and some can live in both water and land, like frogs. Animals also have different ways of moving, whether they fly, crawl, or walk.

Grouping Plants and Animals

As stated in the chapter Diversity in the Living World, Grouping plants and animals based on their similarities helps us better understand and organize the natural world. Plants can be grouped according to their height, stem structure, and other characteristics. Similarly, animals can be grouped based on their movement, habitat, and food habits.

Grouping Plants

Plants can be classified into three major groups:

  • Herbs: Small plants with soft stems (e.g., tomato).
  • Shrubs: Medium-sized plants with hard stems (e.g., rose).
  • Trees: Tall plants with thick, woody stems (e.g., mango).

Activity 2.3: Let us Group Plants and Animals
Collect pictures of various plants and animals. Group them based on common features like height, presence of flowers, or types of stems.

Table: Grouping of Plants Based on Height and Stem Nature

S. No.Plant NameHeightStem ColorStem NatureBranchingPlant Group
1MangoTallBrownHardBranches arise higher upTree
2RoseMediumBrownHardBranches close to the groundShrub
3TomatoShortGreenSoftBranches close to groundHerb

Venation and Roots

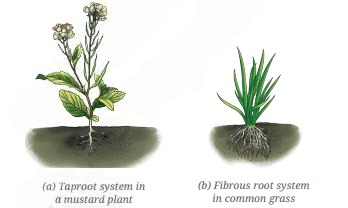
According to the chapter Diversity in the Living World, Leaves can have parallel venation (e.g., grass) or reticulate venation (e.g., hibiscus), and these patterns often correlate with the type of root system in plants.

Activity: Comparing Leaves
Observe different leaf venation patterns and compare them.

Table: Types of Leaf Venation and Roots

S. No.Plant NameVenationRoot Type
1LemongrassParallelFibrous
2ChickpeaReticulateTaproot

Plants with reticulate venation often have taproots, while plants with parallel venation typically have fibrous roots.

A visual of types of leaves from class 6 science chapter 2 - Diversity in the living world
A visual of types of roots from class 6 science chapter 2 - Diversity in the living world

Grouping Animals

Animals can be grouped based on their movements and the body parts they use to move as mentioned in the chapter Diversity in the Living World. For example, birds use wings to fly, fish use fins to swim, and ants use legs to crawl.

Table: Movement in Animals

S. No.AnimalMovementBody Parts Used
1AntCrawlsLegs
2GoatWalks and jumpsLegs
3PigeonFliesWings
4FishSwimsFins

Grouping animals by their habitat or movement helps us understand their adaptation to their surroundings.

Plants and Animals in Different Surroundings

As stated in the chapter Diversity in the Living World, the habitat of plants and animals greatly affects their shape, size, and movement. Animals and plants in deserts, oceans, and mountains have developed special adaptations to survive in those specific environments.

Activity:  Let us Compare and Analyze
Create a table to compare plants and animals in different habitats.

Table: Animals and Plants in Different Regions

RegionPlantsAnimals
DesertCactusCamel
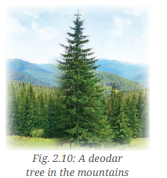
MountainsDeodar TreeSnow Leopard
OceansSeaweedWhale

In deserts, plants like cacti store water in their fleshy stems, and camels have adaptations like long legs and wide hooves to walk on sand without sinking.

A visual of a deodar tree in the mountains from class 6 science chapter 2 - Diversity in the living world

Special Adaptations

Plants and animals have special features called adaptations that help them survive in their environment. For example, camels store food in their humps to survive during times of scarcity, and rhododendrons in the Nilgiris have short heights and small leaves to withstand strong winds.

Conservation of Biodiversity

Human activities such as deforestation and habitat destruction are threatening biodiversity. India has initiated several conservation projects like Project Tiger and the Cheetah Reintroduction Project to protect endangered species.

Sacred Groves are community-protected areas where plants and animals thrive undisturbed. These ancient forests are vital for conserving biodiversity.

Let’s Conclude

In this chapter on Diversity in the Living World, we learned about the diversity of plants and animals, how they are grouped, and their importance in maintaining ecological balance. Plants and animals are dependent on each other and their habitats for survival. By understanding and protecting biodiversity, we ensure the planet remains full of life.

In conclusion, the chapter Diversity in the Living World from CBSE class 6 science offers a comprehensive insight into the remarkable variety of life forms that inhabit our planet. Through engaging activities and vivid observations, students gain a deeper appreciation for the interconnectedness of plants and animals and their roles in maintaining ecological balance. The lessons learned from this chapter not only enhance our understanding of biodiversity but also emphasize the importance of conservation efforts. As we explore the various adaptations and habitats of living organisms, we recognize our responsibility to protect these invaluable resources. 

Remember, the knowledge gained from Diversity in the Living World equips us to make informed choices about how we interact with our environment. By fostering respect for all living things, we contribute to a sustainable future where diversity can flourish. Let’s continue to observe, learn, and appreciate the incredible diversity that surrounds us, ensuring that the wonders of Diversity in the Living World inspire us to take action for the planet’s wellbeing.

Practice questions on Chapter 2 - Diversity in the Living World

Get your free Chapter 2 - Diversity in the Living World practice quiz of 20+ questions & detailed solutions

Practice Now
Science

Chapter 2 - Diversity in the Living World

Learn more about iPrep

Download the App

Watch lectures, practice questions and take tests on the go.

The Wonderful World of Science – Complete Guide For Class 6th Science Chapter 1

A visual representation of the world of science from class 6 science

Welcome to iPrep, your Learning Super App. Our learning resources for the chapter, The Wonderful World of Science in Science for Class 6th are designed to ensure that you grasp this concept with clarity and perfection. Whether you’re studying for an upcoming exam or strengthening your concepts, our engaging animated videos, practice questions and notes offer you the best of integrated learning with interesting explanations and examples. 

As human beings, we are naturally curious about the world around us. From a young age, we begin exploring and asking questions, eager to understand our surroundings. Have you ever felt this curiosity, whether at home or in school? Now that you’re entering the Middle Stage of school, the journey of discovery continues with Science, a new subject that opens the door to a world of wonder and exploration.

What is Science?

Science is more than just a subject; it’s a way of thinking. It helps us observe, ask questions, and seek answers about the world we live in and the universe beyond. Think of science as a grand adventure—a continuous journey where we explore how things work and uncover the secrets of nature. And the most important ingredient for this adventure is curiosity!

From the smallest grain of sand to the largest mountain, from a leaf of grass to a vast forest, science helps us understand the mysteries of our world. Ever looked up at the night sky and wondered why the stars shine? Or watched a flower bloom and wondered how it knows when to open? These are the questions science can answer.

Science is Everywhere

One of the most wonderful things about the world of science is that it is found everywhere, from the depths of the ocean to the vastness of outer space. Whether it’s what’s cooking in the kitchen or what’s happening on the playground, science is present. Every discovery we make adds another piece to the great puzzle of understanding the world. And the best part? This puzzle is endless. Every discovery leads to more questions!

Exploring The World Of Science in Our Daily Lives

As you start learning more, you’ll notice how science connects different ideas, from the simplest observations to groundbreaking discoveries. You may have seen a seed grow into a plant or a caterpillar transform into a butterfly. How does this happen? Science helps explain it all.

What Will We Explore?

We will begin by looking at our home, planet Earth, the only known planet that supports life. There is an incredible variety of life on Earth—plants and animals that survive in different environments. Have you ever wondered how plants and animals grow? Through science, we will explore these questions and more.

Food is another essential part of life, and in a diverse country like India, food is particularly fascinating. Have you ever wondered how the food you eat is made? Science will help you understand the process, from farm to plate.

Materials Around Us

From the paper you write on to the plastic ruler in your box, everything around us is made of different materials. What are they, and how do we distinguish between them? As we explore further, science will guide us to understand these materials better.

The Mystery of Water

Water is another substance that plays a vital role in our lives. Have you ever jumped in a puddle during the rain or wondered why water freezes into ice and boils into steam? Through science, we’ll explore the properties of water and learn why it behaves in such fascinating ways.

Looking Beyond Earth

But why stop at Earth? Science allows us to ask questions about the Sun, Moon, and the millions of stars in the sky. Just as we observe things around us, we can also explore the vast universe beyond Earth.

The Scientific Method

Science is not just about memorizing facts or doing experiments. It is about following a step-by-step process to answer questions. This process is called the scientific method. Here are the steps we follow:

  1. Observation: First, we observe something interesting or something we do not understand.
  2. Ask a Question: Then, we ask a question about what we observed.
  3. Hypothesis: We guess a possible answer to that question.
  4. Experimentation: We test our guesses through experiments or more observations.
  5. Conclusion: We analyzed the results to see if our guess was correct.

Example of the Scientific Method

Let’s take a simple example. Suppose your pen stops writing. What would you do? You would likely guess that the ink has run out. You might open the pen to check. If the ink is finished, your guess was correct. If not, you would make another guess, perhaps the ink dried up. This process of testing guesses is an example of the scientific method!

We Are All Scientists

You don’t need to be in a lab to be a scientist. Every time you try to solve a problem or understand something better, you are using the scientific method. For example:

  • A cook may wonder why food spilled out of the cooker.
  • A bicycle repair person might ask why a tire is flat.
  • An electrician could ask why a light bulb isn’t working.

In these everyday situations, people are applying the same steps as a scientist would.

Activity 1: Think and Write

Describe a daily life situation where you feel someone was following the scientific method. What steps did they take?

Asking Questions is a Key

As we learn science, it’s essential to be curious and observe the world keenly. When we are curious, we start asking how and why. These questions help us explore and understand things better.

Activity 2: Think and Write

If you had to ask “Why?” about something, what would you ask? Write down how you would try to find the answer to your question.

Learning Together

Science is often a collaborative effort. Scientists from across the world work together in teams to solve problems and make discoveries. So, if you can’t find an answer on your own, ask your friends! Learning together makes the journey even more exciting.

Conclusion: Ready to Explore?

Science is like a never-ending adventure, full of joy and discovery. Enjoy the journey, keep exploring, and never stop wondering about the amazing mysteries of the universe. Are you ready to embark on this exciting journey through the wonderful world of science?

Let’s Conclude

As we wrap up our exploration of The Wonderful World of Science, remember that this chapter is just the beginning of an exciting adventure. Through Chapter 1 of CBSE Class 6 Science, we’ve discovered how science is more than just a subject; it’s a way of thinking that encourages curiosity and inquiry about our surroundings. The scientific method guides us in answering questions, whether big or small, turning everyday experiences into opportunities for discovery.

So, as you continue to delve into The Wonderful World of Science, keep your sense of wonder alive. Ask questions, conduct experiments, and share your findings with others. Each time you engage with the world around you, you are embracing the essence of science.

Are you ready to take the next step? Let’s dive deeper into The Wonderful World of Science and uncover more of the mysteries that await us. With iPrep by your side, your learning journey will be filled with exploration, excitement, and endless possibilities. Happy learning!

Practice questions on Chapter 1 - The Wonderful World of Science

Get your free Chapter 1 - The Wonderful World of Science practice quiz of 20+ questions & detailed solutions

Practice Now
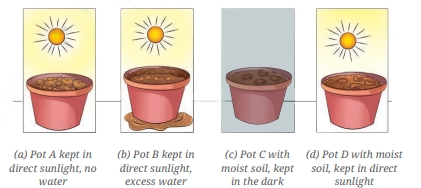
Science

Chapter 1 - The Wonderful World of Science

Learn more about iPrep

Download the App

Watch lectures, practice questions and take tests on the go.